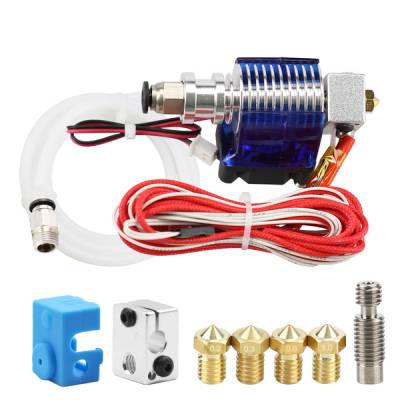
E3D V6
The V6 hot-end is a is modular hot-end designed and marketed by E3D (https://e3d-online.com/) that has been cloned and modified extensively and is available from other manufacturers.
The V6 uses a 22.3mm diameter aluminium heatsink. The complete hot-end include a removable heat break, heater block, heater element, temperature sensor and nozzle. The hot-end is versatile hot-end allowing a wide variety of filaments to be used by switching out individual components to suit. It is available in direct drive and Bowden configurations.
Pros
Installing the E3D V6 can be a suitable upgrade to many printers as it's lightweight can reduce the load on X/Y carriage mechanisms.
The ubiquity of the hot-end makes sourcing compatible parts cheap and well supported by the community. (https://www.thingiverse.com/search?q=e3d+v6)
Cons
Poorly manufactured clones can sometimes include components with poorly machined tolerances or materials with less efficient thermal or mechanical properties.
When retrofitting to existing printers with different styles of printers the overall height may affect printable area if due consideration is not taken as the V6 is considerably longer than some other designs.
Quick note on the E3D Extruder types
There's a number of clone E3D extruders out there, and they can all give excellent results. There are, however, a few things that you need to keep in mind. While the main benefit of improving load on the X carriage still exists, the clone hotends are often shipped with a PTFE tube continuing right into the hotend. While this is fine (it's how a lot of hotends work), it does mean that temperatures above 260 degrees Celsius may cause the PTFE tube to break down, releasing neurotoxins (this is also the reason why they recommend not to leave Teflon coated frying pans on the stove unattended for too long). So make sure you don't crank it too hot! In addition, the insulation between the metal junction position on the hotend is increased, meaning the benefit for the V6 is reduced. A genuine E3D hotend will have the PTFE tube stop before it enters the 'hot' part of the hotend, so that the hotend is truly all-metal. If you want a cheap alternative that's a proper E3D hotend, you can replace the throat, block, nozzle and electronics with genuine E3D parts.
Installing the E3D V6
Replacement Parts
Don't take your printer apart yet! You'll first have to 3D print the replacement mount for the X carriage and a bowden extruder mount. This will allow you to feed your filament into the extruder properly. I've linked one of either that work well on thingiverse below, but any well designed mount and extruder should work. If you haven't already, you'll also need a slotted belt holder for the X carriage for it to be compatible.
Once you've downloaded these, go ahead and print them! Make sure you measure the E3D extruder you have (from nozzle to the end of the brass nut at the top) to determine which of the two extruder mounts you need to print.
Installing
Installing the Extruder Mount Installing the extruder mount is as simple as using the same screws as were used on the assembly of the X carriage to attach the new extruder mount to the bearing blocks. After that, the belt holder can be attached to the back using M3 screws (pre-thread them into the PLA or ABS you printed using a smaller M3 screw, then finally screw them in. Attach the E3D extruder by slotting the narrow part of the extruder into the slot. Then add and tighten the cap onto the extruder and rotate the extruder to your desired location (it doesn't matter the rotation, as the nozzle will always be a straight line from the top). Then use the two extra supplied Anet wood screws to tighten the cap into the mount (pictures to come soon).
Installing the Bowden Motor Mount Some printers in the US are coming with a 1/4 Inch thread on the end of the PTFE tube coming from the extruder instead of the required M6 thread. If this is the case, you'll need to either get an adapter or a new connector for the tube.
Remove the tab holding one of the Z alignment rods in place and remove it. Retain the screw and nut. Use this screw and the screw on the frame behind it to attach the bowden mount to the frame.
Simply disassemble the old extruder and use the Anet supplied 25mm M3 screws (with 3 washers) to screw the motor, then the mount, then the squashing, springy extruder interface onto the mount.
Final Step
Be confident, and move the hotend to the furthest away location from the extruder. Put a mark on the PTFE tube where it sits to connect to the bowden extruder (the M6 hole on the left) and cut the tube straight with the Anet supplied clippers. Make sure to bend the tube back so it's perfectly circular. Screw the connector for the tube into the M6 hole in the extruder and attach the Bowden tube by holding down the skirt and inserting.
You're done! Have fun with your new E3D V6 Extruder!

